---
title: Managing Recipient Lists
description: Below are some step-by-step tutorials for basic management of recipient lists.
---
[Skip to content](https://help.socketlabs.com/docs/managing-recipient-lists#main-content)
English
Show submenu for translations
[Contact us](https://help.socketlabs.com/docs/kb-tickets/new?hsLang=en)
[](https://www.socketlabs.com/)
Open main navigation
Close main navigation
- English
Show submenu for translations
- [Contact us](https://help.socketlabs.com/docs/kb-tickets/new)
SocketLabs is here to help!
- There are no suggestions because the search field is empty.
1. [Help Center](https://help.socketlabs.com/docs?hsLang=en)
2. [Marketing Tools](https://help.socketlabs.com/docs/marketing-tools?hsLang=en)
# Managing Recipient Lists
## Below are some step-by-step tutorials for basic management of recipient lists.
Create A New List
1. Log into the SocketLabs On-Demand Control Panel, click the Email Marketing button, and select Manage Your Recipient Lists Management from the drop-down menu.
2. Click the Create a New List button.
3. Enter the desired list name in the pop-up window and click Create. All details for this list will be displayed.
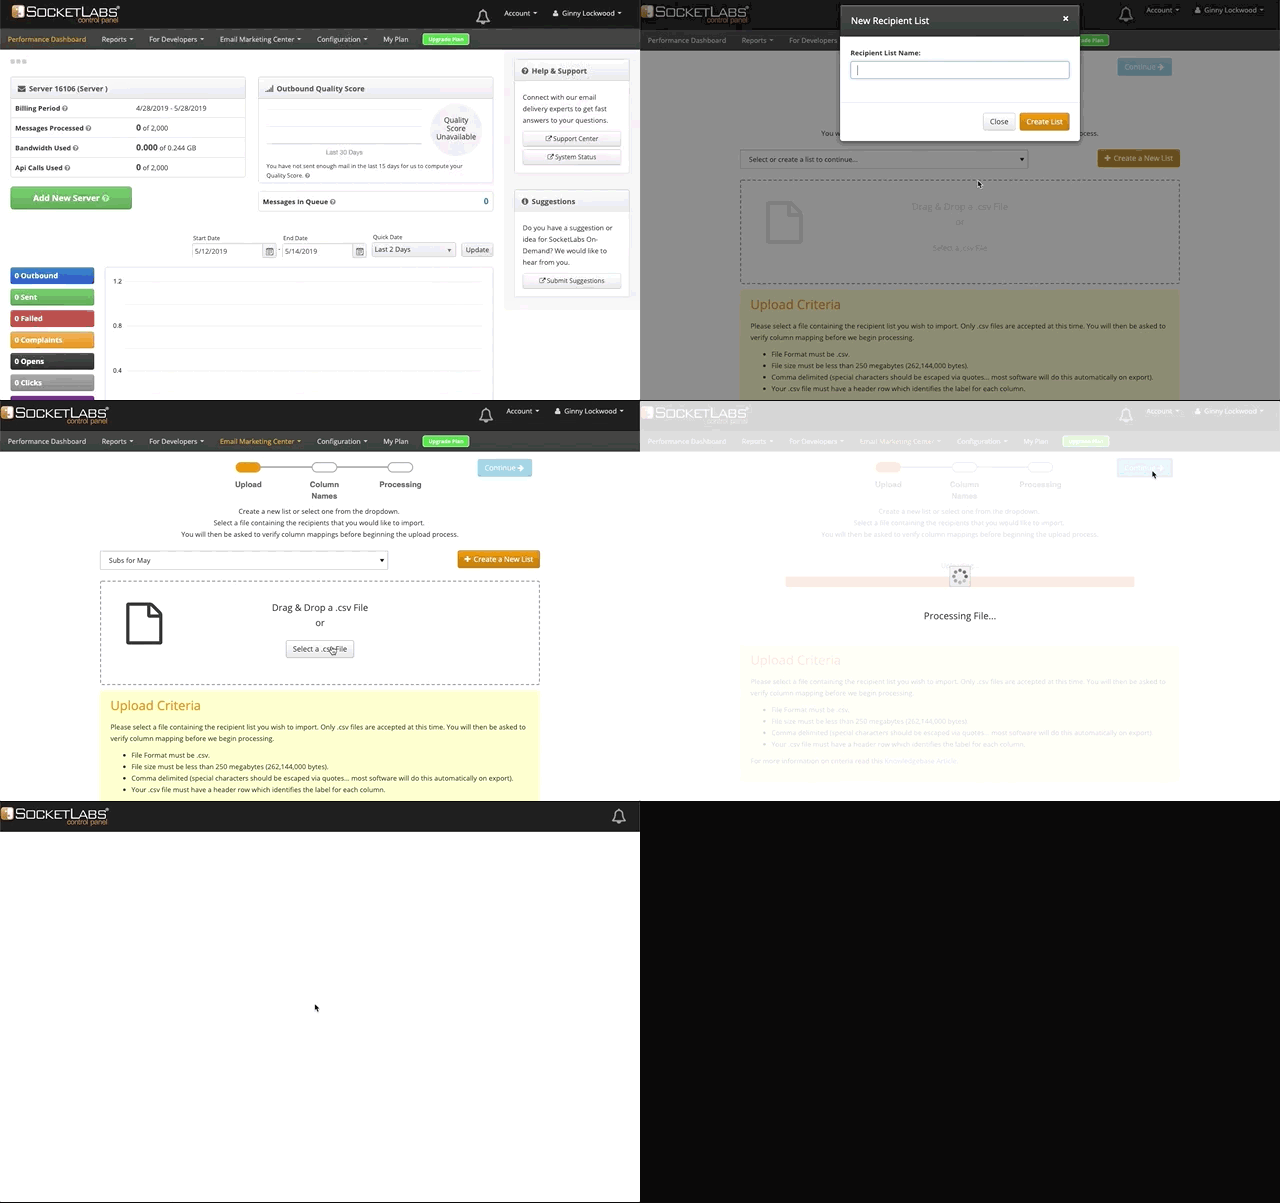
### Upload Recipients In Bulk
[](https://files.readme.io/aec9ca1-uploadtomaillist.gif)
1. Log into the SocketLabs On-Demand Control Panel, click the Email Marketing button, and select Upload a New List in the List Management section of the drop-down menu.
2. Here you can either add the recipients in your spreadsheet to an existing list or create a brand new one to house this new information on its own. To add to an existing list, choose one from the dropdown menu labeled "Select a List". To create a new list, type the desired list name into the text field at the top of the dropdown and click the + button. Our control panel will confirm the list was created successfully.
3. Click "Import a .csv file from your computer." to choose your recipient spreadsheet or drag the file over the upload box and drop it there. This must be a .csv file that conforms to a specific format. See [here](https://help.socketlabs.com/docs/recipient-list-format?hsLang=en) for details.
- Please ensure that your list was acquired in compliance with our [Acceptable Email Marketing Address Acquisition Methods](https://help.socketlabs.com/docs/acceptable-email-marketing-address-acquisition-methods?hsLang=en).
4. The page will confirm whether file was of an acceptable size and type. If it is, you may then click Continue.
5. At this point our system will load and display the first few rows of data from your file. Here you can select names for each of your columns, either existing ones directly from your spreadsheets or new
ones you type in manually. The only required column name is EmailAddress. No two columns can have the same name nor can any of them have no name at all. You can also choose to omit a column entirely if you don't want certain parts of your data to be included. To do this, simply select "Ignore This Column" from the header name dropdown. We limit all uploads to a maximum of 20 columns.
6. Click Continue.
7. You should now see a message indicating that your upload has been successfully initiated. Processing this data is typically swift but may take a few minutes for exceptionally large lists. You can check the status of a pending or completed upload by clicking on the Upload History button.
8. When this is finished as well, all of your newly-uploaded recipient information will be visible on the List Management page.
### Add A Recipient To A List You Created
1. Log into the SocketLabs On-Demand Control Panel, click the Email Marketing button, and select Manage Your Recipient Lists in the List Management section of the drop-down menu.
2. Select a list you have created from the drop-down menu.
3. Click Add Recipient. In the pop-up you can enter the email address and name info for your new recipient. You will also see a list of all Custom Fields you included while uploading recipients in bulk or have added manually. Any fields you do not wish to use for this recipient, simply leave blank. To add a new Custom Field, enter the field name in the text box in the lower right-hand corner of the pop-up and click +.
1. Enter the information you would like to associate with the recipient and click Save.
### Delete A Recipient From A List
1. Log into the SocketLabs On-Demand Control Panel, click the Email Marketing button, and select Manage Your Recipient Lists in the List Management section of the drop-down menu.
2. Select a list you have created from the drop-down menu.
3. Click the Delete button aligned with a recipient you would like to remove. Note that this will not delete the recipient from any other lists to which you may have added it.
4. Confirm that you would like to delete the recipient in the pop-up window.
### Edit Individual Recipients' Information
1. Log into the SocketLabs On-Demand Control Panel, click the Email Marketing button, and select Manage Your Recipient Lists in the List Management section of the drop-down menu.
2. Select a list you have created from the drop-down menu.
3. Click the Edit button aligned with a recipient whose information you would like to change. A pop-up will appear in which all information associated with the recipient is displayed. Change this as you wish.
1. Once all information is updated to your satisfaction, click Save Changes.
Custom fields are shared across all lists that are on the same server. This allows you to change a recipient's information in one place and have it updated on every list the recipient is currently on, rather than making changes separately for each one. Please be aware that adding a recipient with updated information or editing one will apply those updates uniformly across all of a server's lists.
- [Fundamentals](https://help.socketlabs.com/docs/fundamentals?hsLang=en#main-content)
- [StreamScore](https://help.socketlabs.com/docs/fundamentals?hsLang=en#streamscore)
- [Reports](https://help.socketlabs.com/docs/fundamentals?hsLang=en#reports)
- [Frequently Asked Questions](https://help.socketlabs.com/docs/fundamentals?hsLang=en#frequently-asked-questions)
- [Advanced](https://help.socketlabs.com/docs/advanced?hsLang=en#main-content)
- [Security](https://help.socketlabs.com/docs/advanced?hsLang=en#security)
- [DNS Authentication](https://help.socketlabs.com/docs/dns-authentication?hsLang=en#main-content)
- [DKIM](https://help.socketlabs.com/docs/dns-authentication?hsLang=en#dkim)
- [SPF and Custom Bounce Domain](https://help.socketlabs.com/docs/dns-authentication?hsLang=en#spf-and-custom-bounce-domain)
- [Deliverability](https://help.socketlabs.com/docs/deliverability?hsLang=en)
- [For Developers](https://help.socketlabs.com/docs/for-developers?hsLang=en#main-content)
- [Event Webhooks](https://help.socketlabs.com/docs/for-developers?hsLang=en#event-webhooks)
- [Integrations](https://help.socketlabs.com/docs/integrations?hsLang=en#main-content)
- [Languages and Frameworks](https://help.socketlabs.com/docs/integrations?hsLang=en#languages-and-frameworks)
- [Mail Servers](https://help.socketlabs.com/docs/integrations?hsLang=en#mail-servers)
- [Web Clients and Plug-ins](https://help.socketlabs.com/docs/integrations?hsLang=en#web-clients-and-plug-ins)
- [Mail Clients](https://help.socketlabs.com/docs/integrations?hsLang=en#mail-clients)
- [Marketing Tools](https://help.socketlabs.com/docs/marketing-tools?hsLang=en#main-content)
- [Tips and Tricks](https://help.socketlabs.com/docs/marketing-tools?hsLang=en#tips-and-tricks)
- [Troubleshooting](https://help.socketlabs.com/docs/troubleshooting?hsLang=en#main-content)
- [SocketLabs Inbound SMTP Gateway Errors](https://help.socketlabs.com/docs/troubleshooting?hsLang=en#socketlabs-inbound-smtp-gateway-errors)
- [SocketLabs Outbound SMTP Errors](https://help.socketlabs.com/docs/troubleshooting?hsLang=en#socketlabs-outbound-smtp-errors)
- [Spotlight Email Analytics](https://help.socketlabs.com/docs/spotlight-email-analytics?hsLang=en)
- [Hurricane MTA](https://help.socketlabs.com/docs/hurricane-mta?hsLang=en#main-content)
- [Advanced Hurricane Usage](https://help.socketlabs.com/docs/hurricane-mta?hsLang=en#advanced-hurricane-usage)
- [Upgrading Hurricane](https://help.socketlabs.com/docs/hurricane-mta?hsLang=en#upgrading-hurricane)
- [Troubleshooting](https://help.socketlabs.com/docs/hurricane-mta?hsLang=en#troubleshooting)
- [Hurricane Maintenance](https://help.socketlabs.com/docs/hurricane-mta?hsLang=en#hurricane-maintenance)
- [Getting Started with Hurricane](https://help.socketlabs.com/docs/hurricane-mta?hsLang=en#getting-started-with-hurricane)
- [Basic Hurricane Usage](https://help.socketlabs.com/docs/hurricane-mta?hsLang=en#basic-hurricane-usage)
- [Complex Sender](https://help.socketlabs.com/docs/complex-sender?hsLang=en)
[](https://www.socketlabs.com)
Copyright © 2026, SocketLabs LLC